Tutorial: Color Correction with Avid Media Composer
本教程演示了如何通过在色彩校正模式下工作来利用Avid的强大而高效的色彩校正, 它可以让你快速访问它的色彩分级功能,但在你编辑的时候不会妨碍它们.
长期以来,Avid一直是主要故事片和黄金时间脚本电视节目的压倒性NLE选择. Avid的众多优势之一是应用色彩校正的方法. In the last few years, 色彩校正已经由编辑直接使用,而不是由色彩师单独使用. 这个过程可以让你的项目在客户眼中产生最明显的不同, so it’s a very good thing to know how to do, 关键是你的NLE能让你轻松地做好它.
大多数其他NLE要么作为效果添加色彩校正,要么是一个完全独立的过程,需要离开NLE,然后返回编辑器. In Avid, color correction is a mode, 它可以让你快速访问它的功能,但在你编辑的时候不会妨碍它们. It’s really the best of both worlds.
一般来说,你想要根据周围的镜头进行色彩校正. 这意味着色彩校正实际上应该是在编辑结束时完成的过程. But as we all know, when we think the final edit is done, there’s always something else that gets tweaked.
In systems that require roundtripping, this takes a lot of time, requires specialized workflows, and rarely works properly or conveniently. 不过,在Avid中,你只需点击一个按钮就可以更新编辑或色彩校正.
In Avid, 您可以使用与编辑相同的输入工具进行色彩校正, such as a mouse or a trackball or tablet. 但如果你想大幅提高效率,用一个看起来很酷的界面给你的客户留下深刻印象, 你可以使用类似Avid Artist Color User Interface的界面 Figure 1 (below). I’ll use a trackball in this tutorial, 但当我需要尽快做很多更正时, 我使用艺术家颜色来保持我的时刻和调整的东西在最方便的方式.
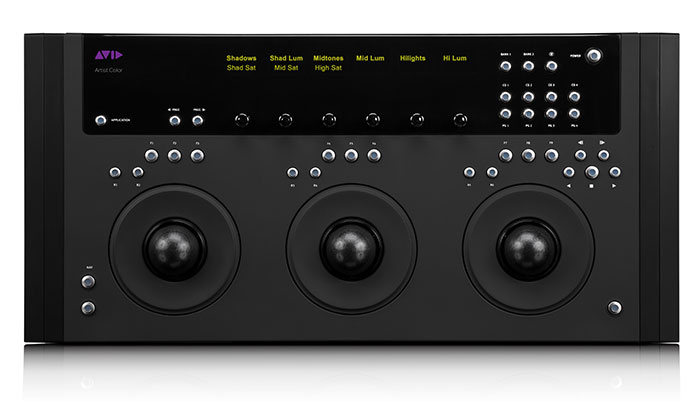
Figure 1. Avid的艺术家色彩可以提高你的色彩校正效率.
Getting Started in Avid Color Correction Mode
让我们来看看色彩校正是如何在Avid中工作的.
With the sequence shown in Figure 2 (below) 添加到Avid中,有两种简单的方法来开始颜色校正.

Figure 2. The sequence we'll work with in this tutorial. Click the image to see it at full size.
From the Windows pull-down menu (Figure 3, below),你可以打开一个颜色校正工作区与所有的工具布局自定义的方式,你喜欢他们. Or you can use the Color Correction Mode button (Figure 4, below Figure 3),其中一个位于智能工具下的时间轴左下方. 这两个按钮都可以很容易地映射到自定义键盘快捷键.

Figure 3. 通过Windows下拉打开颜色校正工作区.

Figure 4. Entering Color Correction Mode by clicking a button.
In Color Correction Mode there are three windows (Figure 5, below).
The Composer Window
At the top is the Composer window, 与编辑模式相同,只是有三个显示器而不是两个. In the Default mode, 这些会在中间显示你正在分级的镜头, the previous shot in the sequence to the left, and the next shot in the sequence to the right. 你可以把这些监视器做成任何你想要的东西,包括波形监视器和矢量监视器. 每个窗口下方还有用于导航时间轴的控件. 你可以看到在你的修正和原始之间的分裂与左边的按钮. 您可以使用next按钮从一个更正跳转到上一个或下一个更正. 如果不做任何修正,它们就跳到序列的开头和结尾. 你可以只播放当前更正与播放按钮, 你可以用next to按钮跳转到上一个和下一个未校正的镜头. 您可以使用“最后”按钮清除、撤消或删除更正.

Figure 5. Color Correction Mode. Click the image to see it at full size.
The Timeline
At the bottom is the Timeline. 这与你在编辑模式下看到的时间轴和在色彩校正模式下浏览时间轴是一样的, is basically the same as in editing. 一个重要的提示是要确保当你进入色彩校正模式, 你有想要进行色彩校正的视频轨道. 颜色校正在你想要的轨道上面的一个空填充层将会对填充层下面的所有剪辑应用颜色校正. So be warned, this can be used for good or for evil.
Related Articles
Cut的艺术史蒂夫·赫尔菲什解释了如何自定义您的键盘和键盘快捷键,以便在Avid Media Composer中进行流畅和精简的编辑.